
1. Who is Plo Koon?
Plo Koon was a Force-user Jedi Master from the planet Dorin and a prominent member of the Jedi High Council in the last years of the Galactic Republic.
As a Jedi General in the Clone Wars, he played an important role in the conflict between the Republic and the Confederacy of Independent Systems.
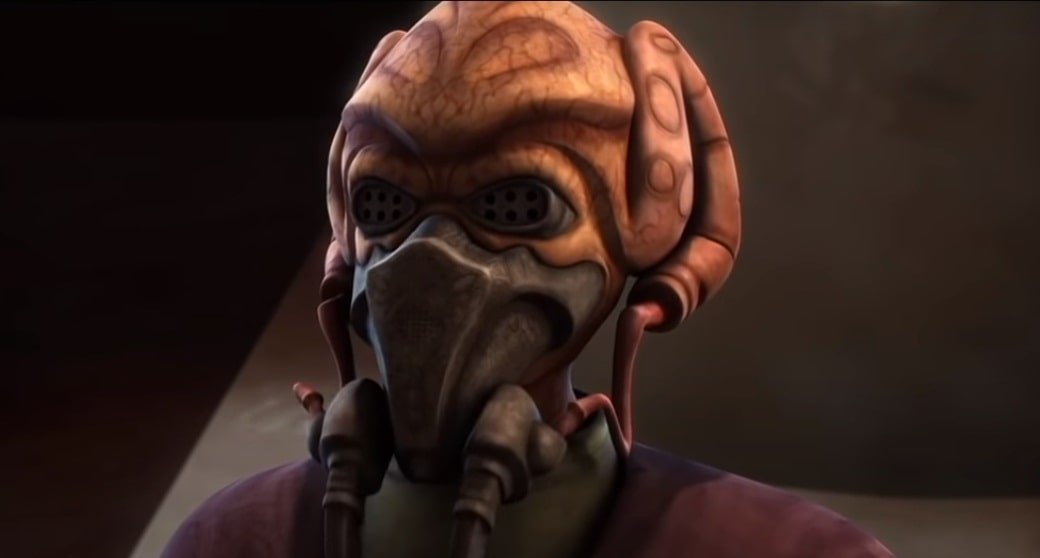
Throughout the war, Koon led the 104th Battalion on perilous missions. He wore a breath mask to filter the air to match that of his home planet, Dorin, and goggles to protect his eyes from drying out.
After training his Padawan Bultar Swan to become a Jedi Knight, Plo Koon fought in and survived the First Battle of Geonosis, which resulted in the deaths of nearly two hundred Jedi and marked the beginning of the Clone Wars.
At the outset of the conflict, he set out on a mission to locate the Separatist warship Malevolence. Following several attempts to destroy it, Koon and his peers succeeded in bringing it down. He frequently collaborated with Ahsoka Tano, whom he had discovered years before the war and with whom he shared a special bond.
During the war, he played critical roles in many battles, including those on Felucia, Lola Sayu, and Kadavo. As the war progressed, Ahsoka Tano was wrongly accused of bombing the Jedi Temple and expelled from the Jedi Order. When the true culprit was found, Koon and the Council offered her the chance to rejoin, but she refused and left the Order.
In the final days of the Clone Wars, after the battles of Coruscant and Utapau, Plo Koon led the 442nd Siege Battalion in the Battle of Cato Neimoidia. Following their victory, as he and a squadron of ARC-170 starfighters flew over the bridge cities, he was shot down and executed by his troops due to Order 66, which commanded the massacre of Jedi across the galaxy by their own soldiers. Shortly after, Anakin Skywalker, now serving Darth Sidious, killed Viceroy Gunray and ended the Clone Wars by shutting down the battle droids.
2. Where Was Plo Koon Born and How Did He Become a Jedi?
Plo Koon was born on the planet Dorin. At some point during his early years, he was identified as Force-sensitive and brought into the Jedi Order. He was chosen as the Padawan learner of Jedi Master Tyvokka. Over time, Koon advanced within the Order, eventually attaining the esteemed rank of Jedi Master.
3. How Did Plo Koon Assist Mace Windu During the Oosalon Mission?
When the warlord Guattako abducted several children to bolster his army on the planet Oosalon, Jedi Master Mace Windu was dispatched to rescue them. Windu overcame the warlord’s forces, though Guattako himself was fatally shot by one of the kidnapped children. Shortly after the conflict was resolved, Plo Koon arrived alongside Depa Billaba and Qui-Gon Jinn to provide additional assistance.
4. How Did Plo Koon Discover Ahsoka Tano and Bring Her to the Jedi Order?
While on a mission to the planet Shili, the homeworld of the Togruta species, Plo Koon encountered a three-year-old girl named Ahsoka Tano, who displayed a strong connection to the Force. He brought her to the Jedi Temple, where she began her training as a Jedi. Over the years, Koon and Tano maintained a close bond, fostering a unique friendship rooted in mutual respect and trust.
5. When Did Plo Koon Join the Jedi Council and What Were His Early Duties?
By the year 33 BBY, Koon had achieved the rank of Jedi Master and was appointed to the Jedi High Council. During this period, he worked alongside Master Saesee Tiin to oversee the refitting of the Jedi Order’s fleet of surface vehicles.
6. Why Did Plo Koon Travel to Kwenn, and What Happened There?
During a Jedi Council meeting, Qui-Gon Jinn challenged the Council to prioritize attention on individual lives and the living Force, criticizing the Order’s focus on larger-scale issues. This conversation led to discussions about closing the Jedi outpost on Kwenn, a station that had been operational for two centuries and required considerable Jedi effort to establish. The Council resolved to visit Kwenn in person and commemorate the outpost’s bicentennial anniversary as part of their decision-making process.
Koon and Saesee Tiin traveled together to Kwenn via a Jedi shuttle, arriving at the spaceport on Capital Key. Upon landing, Koon adjusted his breathing apparatus to accommodate Kwenn’s deteriorating atmosphere, which, despite its decline, was still less severe than Coruscant’s. The two Jedi, without specific orders, opted to assist where they could. They took a Kwikhaul landspeeder taxi driven by the droid SK-89 to reach the Bivall Colony on Parva Key, where Koon had previously visited and knew of refugees in need of aid.
During their journey, SK-89’s inexperience as a driver became apparent, nearly causing collisions at several points. When their vehicle was ambushed by speeders mid-route, Tiin assumed control of the landspeeder and attempted to evade the attackers. Koon refrained from using his lightsaber, sensing something unusual. Eventually, the speeders forced them back to the Kwikhaul depot, where a mob revealed that their anger was directed at SK-89 rather than the Jedi.
The situation turned out to be a labor dispute between Kwikhaul’s owner, Fraxa, and the company’s former drivers, who had been replaced with droids earlier that day. Fraxa demanded the Jedi arrest the workers for destroying property, while the workers protested that the droids were unsafe and Fraxa had sufficient funds to keep human drivers employed. Koon, known for his diplomatic skills, suggested solutions but deferred to Tiin’s expertise. Tiin proposed repurposing Kwikhaul’s landspeeders for oceanic tourism and waste collection, satisfying both parties and initiating work on the new initiatives with the help of the Jedi.
6.1 How Did Plo Koon Help Kwenn’s Population During His Mission?
While stationed on Kwenn, Koon and Tiin continued their efforts to assist the local population. At one point, they collaborated with Even Piell to transport a group of stranded teens and helped Oppo Rancisis rescue a beached oroko by orchestrating an elaborate plan to direct water toward the creature. Though Tiin remained skeptical about restoring Kwenn’s prosperity, Koon expressed optimism, believing the Jedi could guide the people toward rebuilding their community.
6.2 How Did Plo Koon Protect Kwenn During the Bicentennial Celebration?
Prior to the bicentennial celebrations on Kwenn, the Jedi received intelligence indicating that allied pirate gangs under Zilastra’s leadership planned to attack the event. To prepare, Plo Koon coordinated with the staff at Kwikhaul, where he and Saesee Tiin had been working during their stay. Taxis were strategically stationed near the Gala Key Arena to facilitate rescues during any potential violence.
When the pirate assault commenced, Koon and SK-89 acted as dispatchers, directing taxis to evacuate attendees to safety and transporting Jedi to critical areas of the conflict. The drivers also relayed real-time updates to Koon, including the location of the Pelagic—a casino barge serving as the pirates’ headquarters.
Koon’s coordinated efforts allowed Master Depa Billaba to locate Zilastra at the Jedi outpost. After Billaba rescued her charge, Kylah Lohmata, their makeshift escape vehicle collapsed, sending both tumbling. Fortunately, Koon, Mace Windu, and Yoda arrived just in time to cushion their fall with the Force. Following Zilastra’s capture, Koon joined the Jedi Council in speaking with the detained pirate leader.
Before departing Kwenn, Koon and Tiin restored an ARC-8 starfighter that Tiin had borrowed during the battle. Koon expressed satisfaction with the positive impact they had made, while Tiin, ever pragmatic, focused on the tasks awaiting them back on Coruscant. Koon took a moment to encourage Tiin, reminding him that his ability to deliver unfiltered truths was invaluable and urging him to engage with others more often instead of isolating himself in hangars or meetings.
6.3 What Role Did Plo Koon Play in the Naboo Crisis and Its Aftermath?
During the Trade Federation’s blockade of Naboo, Supreme Chancellor Finis Valorum requested Jedi intervention to resolve the conflict. Masters Qui-Gon Jinn and Obi-Wan Kenobi were dispatched to negotiate, but the Federation attempted to assassinate them. The Jedi escaped with Queen Padmé Amidala and brought her to Coruscant.
After arriving on Coruscant, Jinn informed the Jedi Council about his duel with a Zabrak warrior, whom he suspected was a Sith. He also introduced Anakin Skywalker, a young boy he had freed on Tatooine, claiming Anakin to be the Chosen One prophesied to bring balance to the Force. Although Anakin demonstrated an unusually high midi-chlorian count and a strong connection to the Force, Koon and the other Council members expressed skepticism about Jinn’s belief that the Sith had returned. They ultimately refused to allow Anakin’s training due to his age and emotional attachments.
Following Jinn’s death at the hands of the Sith apprentice Darth Maul during the liberation of Naboo, the Council convened to discuss his final request. As a way to honor their fallen comrade, they elevated Obi-Wan Kenobi to the rank of Jedi Knight and granted him permission to train Anakin as his Padawan.
7. How Did Plo Koon Respond to the Secessionist Crisis and the Threat of War?
Ten years after the Naboo blockade, Plo Koon continued his service on the Jedi Council and successfully trained his Padawan, Bultar Swan, to become a Jedi Knight shortly before the outbreak of the Clone Wars.
During this period, the Republic faced growing tensions as thousands of star systems joined a secessionist movement seeking independence. The Council worried that if war broke out, they would lack the resources to defend the Republic. When an assassination attempt was made on Senator Padmé Amidala, the Council assigned Obi-Wan Kenobi and Anakin Skywalker to protect her.
Koon participated in discussions with Supreme Chancellor Sheev Palpatine about the growing secessionist threat and the looming possibility of war. He was also present in Palpatine’s office during debates over granting the Chancellor emergency powers to strengthen the Republic’s defenses.
8. What Was Plo Koon’s Role in the Clone Wars?
Plo Koon served as a Jedi General in the Clone Wars, leading missions such as the First Battle of Geonosis and aiding in Republic victories on Felucia and Cato Neimoidia, earning respect as a skilled strategist and pilot. His leadership extended beyond the battlefield, offering mentorship to Ahsoka Tano and fostering camaraderie with his clone troopers.
8.1 What Did Plo Koon Do During the Battle of Geonosis?
Plo Koon was among the 212 Jedi who formed an assault team to rescue Obi-Wan Kenobi, Anakin Skywalker, and Padmé Amidala from captivity on Geonosis. The trio had been imprisoned while attempting to uncover Separatist plans. During their public execution in the Petranaki Arena, Koon and his fellow Jedi revealed themselves, igniting a massive battle against the Geonosians and their droid army.
As the fighting intensified, many Jedi fell in battle. Koon was among the survivors who regrouped in the center of the arena. Despite their reduced numbers, they refused Count Dooku’s offer to surrender. Just as the droids prepared to eliminate them, reinforcements led by Yoda and the newly formed clone army arrived, saving the Jedi from annihilation.
Koon and the other survivors escaped aboard Republic attack gunships and joined the larger clone army in their assault on the Separatist forces. While the Republic emerged victorious, many Jedi lost their lives, and Dooku escaped. The Battle of Geonosis marked the beginning of the galactic conflict later known as the Clone Wars.
8.2 How Did Plo Koon Contribute to the Malevolence Crisis?
Plo Koon tracked the Malevolence and survived its ion cannon assault, later assisting in the Republic’s efforts to neutralize the warship. His strategic support and collaboration with Anakin Skywalker played a pivotal role in halting the vessel’s threat to Republic forces.
8.2.1 How Did Plo Koon Track and Engage the Malevolence?
As a Jedi General, Plo Koon commanded the 104th Battalion, also known as the Wolf Pack. Early in the war, Koon and Clone Commander Wolffe led a fleet of three Venator-class Star Destroyers in search of the Malevolence, a mysterious Separatist warship under General Grievous’ command that was devastating Republic fleets.
Koon’s fleet tracked the Malevolence to the Abregado system, where it came under attack. The Separatist vessel disabled Koon’s fleet using its ion cannon, leaving the Republic ships defenseless. Koon ordered an evacuation and escaped in a pod with Wolffe, Sergeant Sinker, and Boost.
As they drifted in the debris field, Koon and his men worked to repair their escape pod while searching for other survivors. They encountered a hostile boarding pod sent by the Separatists to destroy escapees. Leading Sinker and Boost, Koon exited the pod to confront the droid attackers. Using the Force and their combined skills, they destroyed the enemy pod but revealed their position to the Malevolence. Before it could destroy them, Anakin Skywalker and Ahsoka Tano arrived in the Twilight to rescue Koon and his men.
8.2.2 How Was the Malevolence Finally Destroyed with Plo Koon’s Help?
Following the rescue, the Jedi devised a plan to eliminate the Malevolence. Anakin Skywalker proposed using Shadow Squadron to destroy the warship by targeting its bridge. Although Koon expressed concern about the plan’s difficulty, the imminent threat to the Kaliida Shoals Medical Center prompted him to assist. He piloted his Delta-7B Aethersprite-class light interceptor, Blade of Dorin, to provide fighter escort for the mission.
To reach the medical station before the Malevolence, the squadron navigated a shortcut through the Kaliida Nebula, despite warnings from Koon about the neebrays that inhabited the area. The squadron successfully traversed the nebula, suffering only minor damage.
Upon reaching the Malevolence, Koon and the squadron engaged its defenses. When heavy losses reduced their ability to destroy the bridge, Koon and Ahsoka convinced Anakin to target the ship’s ion cannon instead. Their attack disabled the weapon, causing critical damage to the Malevolence and halting its hyperdrive.
Koon later joined Obi-Wan Kenobi aboard the Resolute to oversee the pursuit of the damaged Malevolence. Although reinforcements were delayed, the Republic fleet was forced to cease fire when Senator Padmé Amidala was captured by the enemy vessel. Koon coordinated with reinforcements led by Luminara Unduli to prepare for a renewed attack. Following Amidala’s rescue, Anakin sabotaged the Malevolence’s navigation systems, causing it to crash into a moon and bringing the crisis to an end.
8.3 What Happened During Plo Koon’s Involvement in the First Battle of Felucia?
During the Republic’s evacuation of Felucia, Separatist forces trapped Obi-Wan Kenobi, Anakin Skywalker, and Ahsoka Tano. Koon led a fleet to provide cover for the evacuation. Piloting a starfighter, he and his wingman, Warthog, defended the gunships carrying ground troops. Koon successfully destroyed several enemy fighters and cleared a path for the transports to escape Felucia.
Afterward, Koon attended a Jedi Council session to discuss Ahsoka’s actions during the evacuation. Her reluctance to retreat had endangered her troops and the mission, leading the Council to reassign her to guard duty at the Temple Archives for reflection.
8.4 How Did Plo Koon Help Rescue Eeth Koth from General Grievous?
When Jedi Council member Eeth Koth was captured by General Grievous, the Separatist leader sent a holotransmission to the Jedi Order, threatening to kill Koth. Plo Koon joined a Council meeting where the transmission was reviewed. As the Jedi deliberated, Clone Commander Wolffe informed Koon that he had discovered a hidden message within the recording.
Upon replaying the transmission, the Council realized that Koth was using hand signals to reveal his location in the Saleucami system. Acting on this intelligence, a strike team led by Obi-Wan Kenobi, Adi Gallia, and Anakin Skywalker launched a successful rescue operation. Although they freed Koth, Grievous managed to escape during the battle.
8.5 What Was Plo Koon’s Role in Tracking Boba Fett and Aurra Sing?
While Koon was briefing the Jedi Council on reinforcing Republic positions along the Hydian Way, Anakin Skywalker’s astromech droid, R2-D2, delivered an urgent message. The recording revealed that Anakin and Mace Windu were trapped in the wreckage of the Endurance on Vanqor after an assassination attempt orchestrated by Boba Fett. Seeking vengeance for his father’s death at Windu’s hands during the Battle of Geonosis, Fett had worked with the bounty hunter Aurra Sing and others to target Windu.
Koon and Ahsoka Tano immediately departed for Vanqor with the Wolfpack to rescue the trapped Jedi. Using the Force, Koon and Tano stabilized the wreckage, allowing clone troopers to extract Windu and Anakin.
After the rescue, the Jedi received a message from Fett and Sing, who revealed they had captured three hostages—Admiral Kilian, Commander Ponds, and another clone officer. Sing executed Ponds as a warning, threatening to kill the others if Windu did not surrender. Recognizing that Windu’s presence might escalate Fett’s anger, Koon volunteered to track down the bounty hunters alongside Ahsoka.
The investigation led Koon and Ahsoka to Coruscant’s underworld, where they searched for Jango Fett’s known associates. After overhearing a lead about Aurra Sing’s location on Florrum, the two Jedi confronted her and Fett. During the encounter, Koon negotiated with Fett, reminding him of his father’s honor. Ultimately, Fett revealed the hostages’ location, enabling their rescue. Fett and Bossk were taken into custody, while Sing was presumed dead after crashing Slave I.
8.6 What New Threats Did Plo Koon Face During the Clone Wars?
Following a brutal assault on the Jedi Temple of Eedit on Devaron, Plo Koon and other Jedi Masters received the bodies of Master Halsey and his Padawan Knox, who had been killed alongside their clone troopers. The severity of the attack prompted a Council meeting to discuss the possibility of a new enemy. Koon speculated that this emerging threat could be a newly appointed Sith Lord, though the identity of the attacker remained unknown.
8.7 How Did Plo Koon Support the Mission to Rescue Even Piell from the Citadel?
When Master Even Piell and his crew were captured by Separatists seeking coordinates to the Nexus Route, a hyperspace lane of strategic importance, Plo Koon briefed the Jedi strike team tasked with their rescue. He explained the dangers of the Citadel, a prison designed to hold Jedi and located on the inhospitable planet Lola Sayu.
The team, led by Obi-Wan Kenobi and Anakin Skywalker, used carbon freezing to evade detection and infiltrate the Citadel. Before their departure, Ahsoka Tano sought Koon’s permission to join the mission, but he upheld Anakin’s decision to exclude her. Despite this, Tano secretly joined the operation.
As the mission progressed, Koon monitored their coded transmissions from the Jedi Temple. When the team became stranded, he led a rescue fleet with Saesee Tiin, Adi Gallia, and Kit Fisto to extract them. Koon devised a strategy to breach the Separatist defenses, successfully retrieving the survivors. Though Master Piell perished during the mission, his sacrifice ensured the Republic’s security of the Nexus Route.
Upon returning to Coruscant, Koon mourned Piell’s loss and helped mediate a dispute regarding the Nexus Route’s intelligence. Captain Wilhuff Tarkin insisted on sharing his half of the information only with Supreme Chancellor Palpatine, while Ahsoka pledged hers to the Jedi Council. Koon vouched for Ahsoka’s role in the mission, covering for her unauthorized participation.
8.8 What Happened During Plo Koon’s Mission to Retake Felucia?
Koon returned to Felucia alongside Anakin Skywalker and Ahsoka Tano to help the Republic secure the planet. Together, they planned an offensive against an outpost on the planet that was receiving reinforcements under General Grievous’ command. Observing from a nearby ridge, Koon decided to divide their forces into three teams for the assault. He chose to lead an attack on the left flank while Skywalker tackled the front gate and Tano led a team to scale the back wall. Once all groups were in position, Koon gave the command to begin the assault. While Skywalker engaged the front gate, Koon scaled the left wall of the base, accompanied by Commander Wolffe and his jetpack-equipped troopers. They swiftly overcame the droid forces, and the teams united in the middle where Tano’s forces also converged. However, Tano herself was missing as she had been covering her team’s flank while they ascended the wall. She failed to respond to her comlink, having been captured by Trandoshan hunters who abducted beings to hunt for sport.
8.9 How Did Plo Koon Handle Ahsoka Tano’s Disappearance?
Koon and Skywalker’s teams searched the surrounding jungle for Tano but found no sign of her. Koon alerted Republic forces across the Outer Rim and instructed spies within the Confederacy to watch for any information regarding her disappearance. He also acknowledged that their mission on Felucia was complete and suggested they return to Coruscant. Skywalker, unwilling to abandon the search for his Padawan, expressed resistance, but Koon reminded him that his emotional attachment was clouding his judgment and insisted they needed to depart.
Back at the Jedi Temple, Skywalker remained committed to overseeing efforts to locate Tano. Koon offered words of reassurance, emphasizing Tano’s resilience and determination—traits she shared with her master—that would help her survive. He also cautioned that Skywalker might not be the one to find her, suggesting instead that her Jedi training could enable her to return independently.
Tano was eventually rescued and brought back to the Jedi Temple by Wookiee General Tarfful and the bounty hunter Sugi, along with Jedi younglings Jinx and O-Mer. They had fought against the Trandoshans with the assistance of another Wookiee, Chewbacca. Koon and Skywalker were among the Jedi who welcomed Tano and the others back to the Temple. Expressing relief at her safe return, Koon later joined Yoda, Windu, Tarfful, Sugi, and other Wookiees in discussions.
8.10 How Did Plo Koon Lead the Rescue of Master Adi Gallia?
After Master Adi Gallia was captured by General Grievous, Plo Koon led a fleet to rescue her. Koon and soldiers from the Wolfpack boarded Grievous’ ship, where Commander Wolffe successfully freed Gallia as Grievous fled. Once resistance aboard the ship had been neutralized, Koon and Gallia reunited. They encountered droids C-3PO and R2-D2, who introduced themselves as belonging to Senator Padmé Amidala. Recognizing the droids, Wolffe confirmed their identities. When C-3PO began recounting an adventure he and R2-D2 had recently experienced, Koon humorously suggested they share the tale with Wolffe, much to his second-in-command’s dismay.
8.11 How Did Plo Koon Help End the Zygerrian Slave Threat?
When the Togruta colony on Kiros was taken over by the Separatists, Obi-Wan Kenobi, Anakin Skywalker, and Ahsoka Tano were sent to liberate the neutral world. Their report to the Jedi Council revealed that the Zygerrians were responsible for the occupation and that they had enslaved the entire colony. The council, deeply disturbed by this development, heard Koon speculate that the Zygerrians were likely collaborating with Count Dooku and the Separatists to rebuild their once-destroyed slave empire. Observing Yoda’s apparent concern, Koon inquired about what was troubling him. Yoda shared his sense of a larger force at play, warning that slavery was a powerful tool that could aid in the rise of the Sith.
To recover the missing colonists and prevent the Zygerrian slave empire’s resurgence, the Jedi Council dispatched Kenobi, Skywalker, Tano, and Clone Captain Rex to infiltrate Zygerria, the Zygerrian homeworld. Despite being discovered and enslaved, Skywalker and Tano managed to escape and alerted the Republic about Kenobi, Rex, and the colonists being held in a slave processing facility on Kadavo. Koon led a small task force to the system to free them. As he commanded fighters to escort his dropships and an Arquitens-class light cruiser, Koon shot down multiple Zygerrian fightercraft. However, he struggled to disable the facility’s ray-shielded cannons, which prevented the cruiser from reaching the captives. Ultimately, Anakin destroyed the shields, enabling the cruiser to rescue the captives. Once all Republic forces and freed slaves were safe, Koon ordered his gunships to destroy the slaving facility entirely.
8.12 How Did Plo Koon Contribute to Protecting the Chancellor from Separatist Plots?
When intelligence uncovered a Separatist plot to either kidnap or assassinate Supreme Chancellor Palpatine, the Jedi Council devised a plan to fake Obi-Wan Kenobi’s death. This would allow him to go undercover as Rako Hardeen to infiltrate the group of conspirators led by Moralo Eval. After the staged assassination, Koon attended Kenobi’s funeral alongside the rest of the Council. During the ceremony, Ahsoka Tano confided in Koon her concerns about Anakin Skywalker’s increasingly erratic behavior, unaware of the Council’s secret plan.
Kenobi successfully earned Eval’s trust and secured a position within his team, which planned to strike during the Festival of Light on Naboo. Once the Council decided to inform Skywalker and Tano about the ruse, they collaborated on a strategy to thwart the attempt and apprehend the conspirators. The mission succeeded, with Kenobi and Skywalker stopping an additional attempt by Count Dooku to capture Palpatine.
8.13 What Was Plo Koon’s Involvement in the Jedi Temple Bombing Investigation?
In 19 BBY, after a bomb exploded in one of the Jedi Temple hangars, the Jedi Council recalled Anakin Skywalker and Ahsoka Tano from their mission on Cato Neimoidia to investigate. Suspecting that a Jedi might be responsible, the Council chose Skywalker and Tano because they had been absent from the Temple during the attack and were above suspicion. The pair soon arrested Letta Turmond, who confessed to feeding her husband nano-droids that turned him into a bomb. However, they believed someone—possibly a Jedi—had orchestrated the plan.
After the deaths of six Jedi in the bombing, Koon attended the funeral service for the fallen. Matters escalated when Tano was accused of orchestrating the attack after Turmond was killed by Force choking while in custody. Tano escaped imprisonment, and several clones were killed during her escape. The Council convened an emergency meeting, with Admiral Tarkin pressuring them to prioritize her capture and trial in a military court. Koon, who refused to believe Tano was guilty, joined Skywalker in the search for her.
While tracking her in Coruscant’s lower levels, Koon and Skywalker encountered Tano with Asajj Ventress. Despite their attempts to detain her, she fled with Ventress. Koon’s team later discovered evidence, including explosives used in the bombing, but remained uncertain of Ventress’ involvement. Tano was eventually captured and brought back to the Temple, where Koon informed Yoda of their findings.
Under pressure from the Senate, the Council reluctantly expelled Tano from the Order to allow her prosecution in a military court. Koon, one of five Council members present during the expulsion, questioned her alliance with Ventress. Tano defended herself, claiming Ventress had been helping her clear her name. During the trial, Skywalker arrived with Barriss Offee, revealing her as the true culprit. Offee confessed, exposing her belief that the Jedi Order had become corrupt.
Following Tano’s exoneration, she was released and returned to the Jedi Temple. Koon, alongside the Council, apologized for their mistake and invited her to rejoin the Order. However, Tano declined, choosing instead to leave the Jedi, leaving Koon visibly saddened as he watched her departure.
8.14 What Did Plo Koon Discover About Sifo-Dyas and the Clone Army’s Origins?
Later that year, the Jedi Temple received a distress signal from a ship once belonging to Jedi Master Sifo-Dyas, who had died years earlier. The Council dispatched Koon to locate the signal’s source. On the desert moon of Oba Diah, Koon and the Wolfpack discovered the wreckage of a T-6 shuttle amidst a sandstorm. Inside, Koon found Sifo-Dyas’ lightsaber and ordered his troops to clear the area and transport the debris back to Coruscant. He contacted the Council to report his findings.
The discovery prompted a discussion among the Council regarding Sifo-Dyas’ controversial vision of a great war and the need for a Republic army—ideas they had dismissed at the time. Jocasta Nu briefed the Council on Sifo-Dyas’ last mission, which was sealed by the Office of the Supreme Chancellor, revealing he had died on Felucia while attempting to negotiate peace between warring tribes. Koon questioned the whereabouts of Sifo-Dyas’ body but was informed that no records existed.
Returning to Coruscant, Koon joined discussions with Yoda, Obi-Wan, and Anakin regarding evidence of a second Jedi’s involvement in Sifo-Dyas’ mission and the disappearance of Silman, an aide to former Chancellor Valorum. Koon noted the proximity of the Pyke Syndicate’s headquarters to Oba Diah, where the wreckage had been found. Obi-Wan and Anakin were sent to investigate further, ultimately uncovering that Count Dooku, as Darth Tyranus, had orchestrated the creation of the clone army. The revelation deeply unsettled Koon and the Council, who chose to conceal the truth to maintain trust in the clone forces.
8.15 What Role Did Plo Koon Play in the Jedi’s Attempt to Assassinate Dooku?
During a Council meeting, the Jedi viewed a transmission from Master Chubor, who was leading the Republic’s evacuation of civilians from Mahranee, a planet overtaken by the Separatists. The recording showed Count Dooku ordering his fleet to fire on the fleeing refugee convoy, resulting in the deaths of Chubor and thousands of civilians. Simultaneously, droid forces on Mahranee exterminated the remaining Mahran population. Dooku claimed the Jedi were responsible for the tragedy, as they continued to support the Republic.
The Council lamented the Jedi’s inability to protect every system under threat due to being stretched too thin. Koon reflected on the countless lives lost during the war, identifying the near-eradication of the Mahran people as one of its greatest tragedies. While Mace Windu and Obi-Wan Kenobi blamed Dooku for the widespread destruction, Koon observed that they were mirroring Dooku’s rhetoric of assigning blame. Windu proposed that the Jedi should consider assassinating Dooku to end the war, a suggestion Koon and other Council members eventually agreed upon despite Kenobi’s objections and Yoda’s reluctance.
The Council assigned Jedi Master Quinlan Vos to carry out the mission, partnering him with Dooku’s former apprentice, Asajj Ventress. Months into the mission, Vos ceased communication with Kenobi, last reporting that he had gained Ventress’ trust. Koon speculated that Ventress might have killed Vos upon discovering his deception, but Kenobi believed otherwise. Ventress eventually informed Kenobi that Vos had been captured by Dooku and turned to the dark side, emerging as Admiral Enigma and leading successful Separatist campaigns.
Koon and the Council deliberated their response, surprised when Kenobi, Skywalker, and Jedi Knight Akar-Deshu brought Ventress to the Council chamber. Although skeptical of her intentions, Koon listened as Ventress revealed her romantic relationship with Vos and admitted to teaching him to use the dark side. She proposed helping the Jedi capture Vos. Koon, wary of trusting Ventress, agreed to Kenobi’s plea to consider her offer. Ultimately, the Council pardoned Ventress in exchange for her assistance in recovering Vos.
The mission revealed that Vos had feigned allegiance to Dooku to learn about Darth Sidious. Ventress was killed protecting Vos, who renounced the dark side and surrendered to Kenobi and Skywalker. Back at the Temple, Vos confessed his actions and sought redemption. Koon and the Council allowed Vos to work under Yoda’s guidance, eventually entrusting him to Kenobi for a mission to return Ventress’ body to Dathomir.
8.16 What Was Plo Koon’s Role in Stopping Operation: Titan?
During a Council meeting, Yoda shared intelligence about “Operation: Titan,” a devastating Separatist weapon capable of shifting the war’s balance. Details were scarce, prompting Obi-Wan Kenobi to suggest searching the databanks of a recently captured Separatist frigate. Yoda agreed and decided to join Anakin Skywalker in pursuing the lead.
Their efforts revealed that Operation: Titan involved constructing a new droid army of “megadroids” on the planet Golatha. Reporting back to the Council, Yoda and Skywalker outlined a plan to destroy the Golatha factory before the megadroids could be deployed. The mission succeeded, halting the Confederacy’s efforts to gain a significant advantage in the war.
9. Plo Koon’s Death
Plo Koon was dispatched to Cato Neimoidia during the final days of the Clone Wars to oversee operations with the 442nd Siege Battalion. After securing a Republic victory on the planet, Koon embarked on a routine patrol in his Delta-7 Aethersprite-class light interceptor.
Unbeknownst to him, Darth Sidious had initiated Order 66, compelling clone troopers to execute their Jedi generals. Clone pilot Jag, under the influence of his inhibitor chip, turned on Koon and fired at his starfighter. Koon was caught off guard, his ship destroyed mid-flight, crashing and killing him instantly.
10. How Is Plo Koon Remembered After His Death?
A year after Order 66, Ahsoka Tano encountered a Sullustan named Malat in Selda’s cantina on Raada. Malat’s compassionate demeanor reminded Tano of Koon. Similarly, she found herself trusting Selda, the Togruta bartender, who also bore similarities to Koon in kindness and reliability.
In contrast, Anakin Skywalker, now Darth Vader, rarely reflected on Koon. During a mission to Ryloth, Koon’s name surfaced briefly in Vader’s memories, causing momentary reflection. Later, during Vader’s vision quest in Fortress Vader, he encountered an illusion of Koon among other Jedi. Wielding their lightsabers, the visions attacked Vader, who ultimately destroyed them, impaling Koon’s illusion as the mantra “Let the past die” echoed in his mind.
11. What Were Plo Koon’s Key Personality Traits?
Plo Koon was a Kel Dor male Jedi Master who stood 1.88 meters (6 feet 2 inches) tall and weighed approximately 80 kilograms. He had distinctive orange skin and required a specialized antiox mask to survive in oxygen-rich environments due to his species’ physiology.
Known for his level-headedness and calm demeanor, Koon was regarded as one of the wisest members of the Jedi Order. He deeply respected and valued all forms of life, maintaining a steadfast belief in the Order’s ability to bring about good. Despite recognizing that his appearance could be intimidating to other species, Koon was optimistic and cared deeply for those around him. He was particularly dedicated to the well-being of his troops and formed a strong bond with the clone troopers of the Wolfpack, who knew he would risk his life for theirs.
Koon shared a special connection with Ahsoka Tano, having brought her into the Jedi Order as a toddler. He became an essential mentor to her throughout her time as a Padawan, offering unwavering support and guidance. This bond became evident when Tano was falsely accused of treason. Although Koon found it difficult to believe that she could have fallen to the dark side, he reluctantly agreed with the Council’s decision to expel her from the Order due to the overwhelming evidence against her. After Tano’s innocence was proven, Koon apologized on behalf of the Council and invited her to return. He was visibly heartbroken when she chose to leave the Jedi Order, though her decision ultimately ensured her survival during Order 66.
Koon was recognized as one of the Jedi Order’s most skilled pilots, frequently earning praise from his peers, including Anakin Skywalker and Mace Windu. Beyond his combat abilities, Koon was a strategic thinker with a talent for organizing and leading large operations. He believed in leading by example and was always ready to assist others, even at great personal cost.
12. What Were Plo Koon’s Combat Skills and Force Abilities?
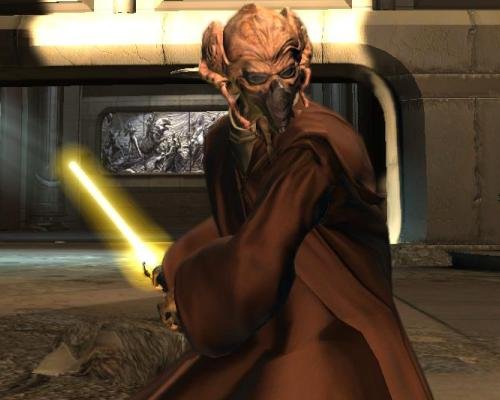
Plo Koon was a Jedi Master of such immense power that even the Sith Lord Darth Maul regarded him as one of the greatest Jedi warriors of his era, despite never having dueled him. Koon had the ability to quickly replenish his power, excelled in telekinesis, and could manipulate objects without needing to see them. He also employed a forbidden Force technique known as Electric Judgment, which many Jedi found disturbingly similar to the Sith’s Force lightning. Koon’s armored talons, based on traditional Kel Dor design, protected his sensitive fingertips and enhanced his Force abilities.
Plo Koon was also highly knowledgeable in the physical sciences. He used his expertise in physics combined with the Force to alter his environment, such as controlling the elements to deflect attacks. He could create small whirlwinds, dense fog, and even ice over limited areas. A notable example of these abilities was during the Yinchori uprising when he manipulated clouds to conceal Jedi movements, causing a blinded enemy to fall off an edge.
Collaborating with other Jedi, Plo Koon once unleashed a wave of power to defeat Yinchori warriors. Alongside Qui-Gon Jinn, he brought down a tunnel to protect Vos and Kenobi during the Stark Hyperspace War, and later crushed another tunnel after a brief pause. While stranded in an escape pod after the Malevolence destroyed his fleet, he used the Force to telekinetically turn around another pod, hoping to greet its occupant, only to discover its front had been destroyed.
Despite the challenges of fighting in space, he managed to defeat a droid with a Force push, maneuver objects to aid a clone in outflanking the droids, and once safe from enemy fire, cut a Droch-class boarding ship off his escape pod and sent it drifting away with a thrust of the Force.
With his Jedi abilities, Koon could strike foes and defend against Force attacks, even redirecting them back at attackers or disarming them. He could also sharpen his senses, enhance his physical traits, leap high—sometimes over enemy base walls—and use the Force to dash into battle. He once defeated a spider droid with a single, swift Force push.
Working with Ahsoka Tano, he used their combined powers from atop a Low Altitude Assault Transport to hold the ruins of the Endurance’s bridge steady, allowing clones to rescue Anakin Skywalker and Mace Windu. Soon after, he used the Force to unlock a lock, pull Boba Fett into his arms, and hurl a table at an assassin. He also demonstrated his skill with Force barriers by holding off a snowstorm.
In addition to being a Jedi, Plo Koon was also a member of the Baran Do, a Force sect from his homeworld of Dorin that predates the Jedi. Many of his family members had been part of this sect over the centuries, and he mastered several of their techniques, including ayna-seff. Koon could use the Force to enhance his observational skills and was adept at seeking guidance from the light. He could also employ malacia, a power used to subdue others.
On one occasion, Koon sent a message across the galaxy to his niece with the help of other Jedi, focusing deeply on the Force. He later used a similar technique on Stark, convincing him to switch sides in exchange for a pardon. If he had been closer, he could have fully controlled Stark and made him surrender outright. Koon could also give brief mental orders to other Jedi and warriors. He attempted to dissuade Ranulph Tarkin from killing his enemies through telepathic exchange. Although he couldn’t perform such feats across great distances without assistance, he successfully contacted Ahsoka Tano when she was nearby, giving her a sense of his location while stranded in space.
Koon could influence others’ thoughts, foresee the future, sense emotions (using this skill on Thyferra to detect Obi-Wan’s fear), and identify Force users. During meditation with Qui-Gon Jinn and Adi Gallia, he planted the thought of a swarm of attacking ships in a pilot’s mind to divert an assault, playing the most important role in this task.

Plo Koon possessed great strength and was a master of hand-to-hand combat, using the light side of the Force to enhance his fighting abilities. He was also a master of Form V/Shien lightsaber combat and was considered one of the most skilled swordsmen in the Jedi Order. He could fend off the infamous Jedi hunter Asajj Ventress even with a broken arm. Additionally, he was trained in Form IV/Ataru and excelled at deflecting blaster bolts and defending himself with a lightsaber.
Koon studied warfare and could use the Force to anticipate his enemies’ general moves. He also had the ability to heal the wounded. Moreover, he could use the Force to unleash a purple-blue energy attack and blast enemies a few feet outward in all directions.
A skilled pilot, Koon was renowned for his piloting abilities, nearly as much as for his lightsaber skills. He was considered the third-best pilot in the Jedi Order, after Anakin Skywalker and Saesee Tiin. Thanks to his thick Kel Dor hide, he could breathe and survive in space for short periods. He was fluent in Basic, Kel Dor, Huttese, and Shyriiwook.
Explore Our Lightsaber Collection


Tony Allen is a writer for LightsabersBlog.com, a website focused on everything related to lightsabers. Tony grew up in Austin, Texas, and went on to study Mechanical Engineering at the University of Texas. Passionate about science fiction and fantasy, Tony has always been deeply involved in hobbies like tabletop RPGs, sci-fi novels, miniature painting, and crafting. This love for creative pursuits drives Tony to write about lightsabers in a way that ignites the imagination of fans around the world.
